How do I import or export
Excel or CSV files?
Instructions for importing and exporting lists with the lineup, schedule, locations, sponsors, or attendees
Sometimes you want to import content you’ve already created with other programmes or platforms into LineUpr. Many events, for example, maintain guest lists that are created with registration portals or office software. In order to avoid having to enter existing information again, you can use our import function. We also offer you the possibility to export existing content from LineUpr so that you can continue to use it in a variety of ways.
Below we explain the import and export function of LineUpr. This works with lists in the areas of “Lineup”, “Schedule”, “Locations”, “Sponsors”, and “Attendees”.
Content
Export
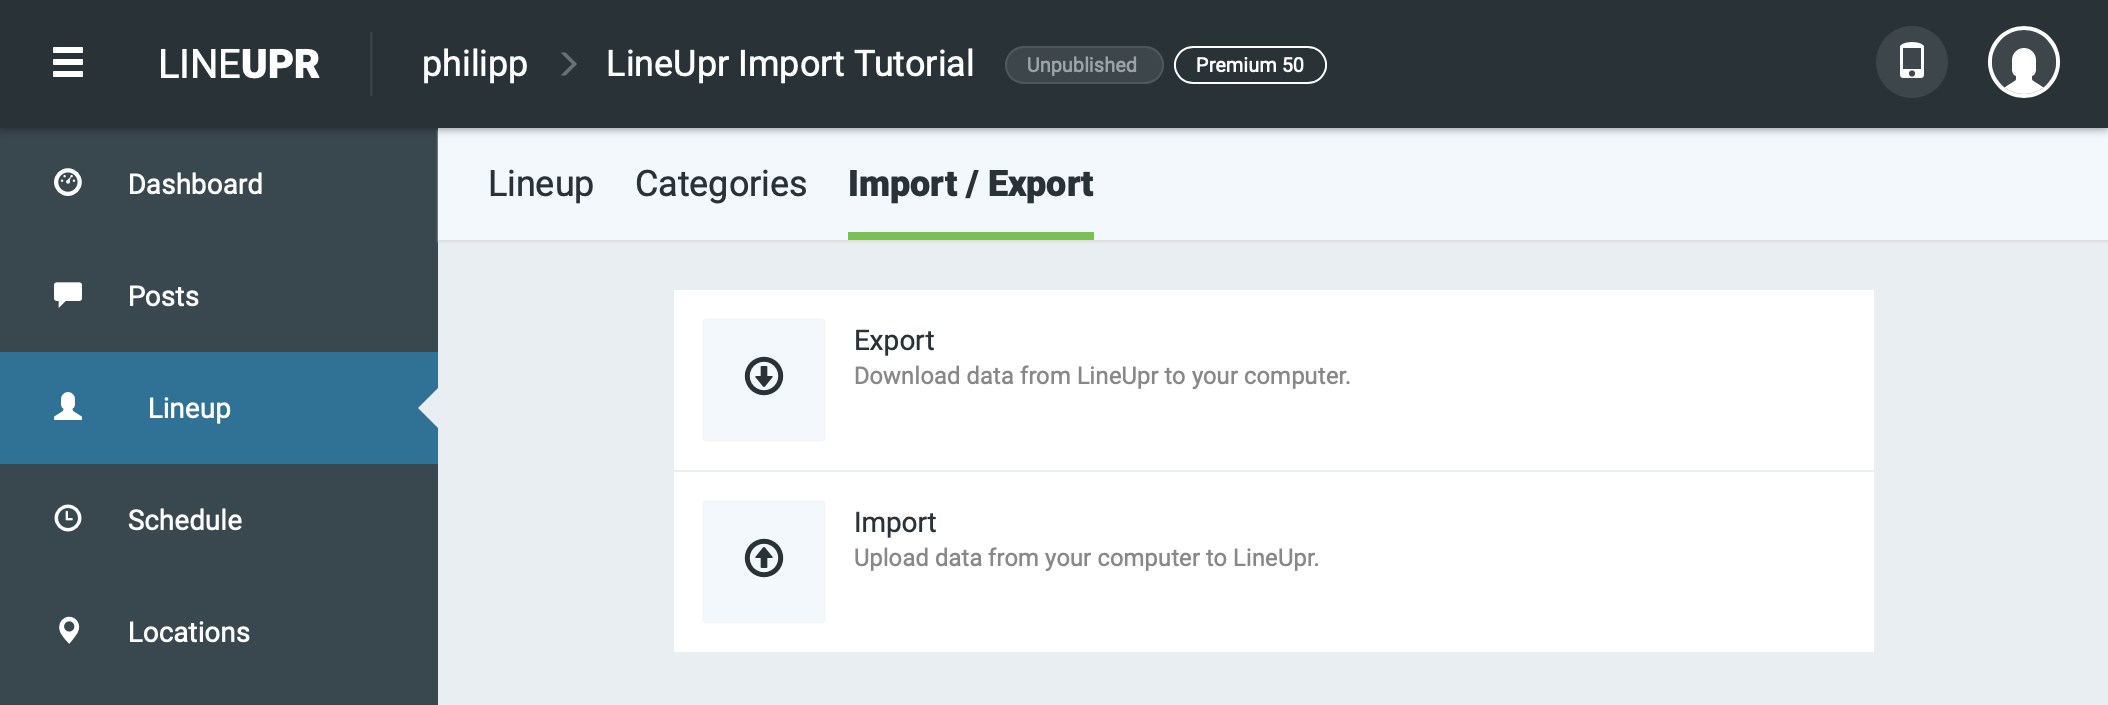
With the export function you can download your lists as Excel or CSV files. This allows you to use the information you entered elsewhere, keep it for backup, or edit it locally on your computer and then import the changes again. You will find the export function in the areas of Lineup, Schedule, Locations, Sponsors, and Attendees: Click there on the heading Import / Export and then on the button Export.

Export of Lists (Lineup, Schedule, Locations, Sponsors, Attendees)
If you are not sure, we recommend that you work with the Excel format; to do this, click on Download Excel. You can open and save this format with a variety of popular office programmes such as Microsoft Excel, Apple Numbers, LibreOffice or OpenOffice.
Click on one of the download buttons to start the Excel or CSV export. The downloaded file contains a row for each entry in your LineUpr list and a column for each piece of information that you can capture in LineUpr (e.g. “Name”, “Subtitle”, “Categories”, “Sorting”, “Description” and “Attachments” in the lineup). The first line of the table gives you information about the meaning of each column.
The column “Slug” serves as a unique identifier of the entries (and is also part of the URL if you load it in the app). If you want to edit exported data and then import it again, it is important that you do not change the identifier.
Export of Feedback (Schedule)
If you have purchased a premium upgrade for your event app, you can also use the Export Feedback function in the area Schedule under Export. This will allow you to instantly download the ratings, comments and frequency of how many times these items have been favored by your guests.
If you click on Download Excel, you will get a file with several tables. The first table contains an overview of your schedule with one line for each schedule item and columns for the average rating (and the frequency of how often 1, 2, …, 5 stars were awarded), the number of comments submitted and the amount of users who have added the agenda item to their favorites.
More detailed information about each individual item can be found in the other tables in the file. The tables each carry the continuous “index” from the overview as a title. In these tables you will find each submitted feedback for the respective item individually broken down with date, comment and rating.
Import
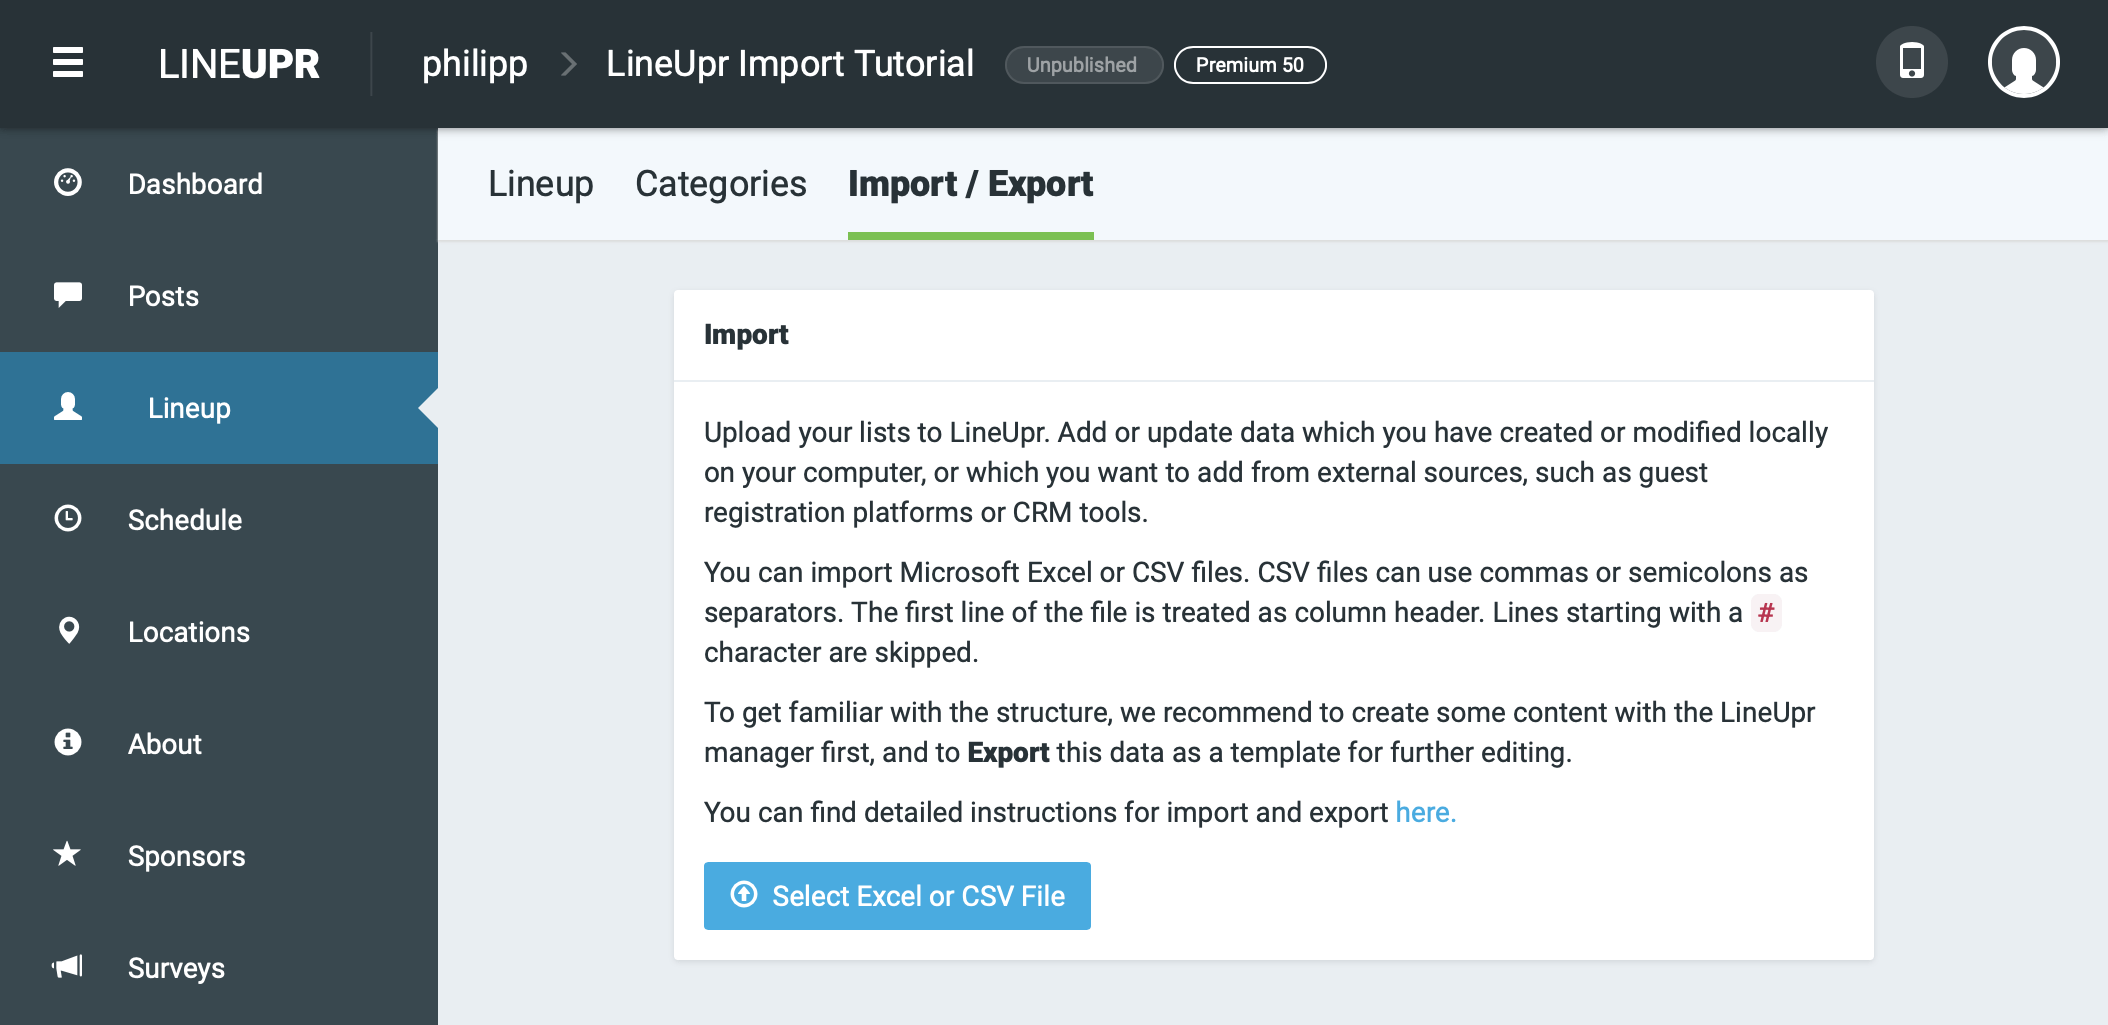
Use the Import function to add or modify data that exists locally on your computer. Just like the Export function, this function is available in the areas of “Lineup”, “Schedule”, “Locations”, and “Sponsors”. Click on the title Import / Export and then on the Import button.
Microsoft Excel or CSV files can be imported. CSV files must be UTF-8-encoded. The first line is treated as a column header and all lines beginning with a # are ignored. CSV files can use either commas or semicolons as separators. For Excel files, please make sure that data is only imported from the first worksheet and that other worksheets are ignored.
Tip: To familiarize yourself with the data structure, we recommend that you first manually create some content in the respective areas before using the import function, then export it using the Export function and then use this file as a template for further steps.
If you want to import content into multiple sections, you should do so by first importing the “Lineup” and “Locations” and then the “Schedule”. This is because schedule items can refer to entries in the Lineup or Locations, and these already have to be present for a flawless import.

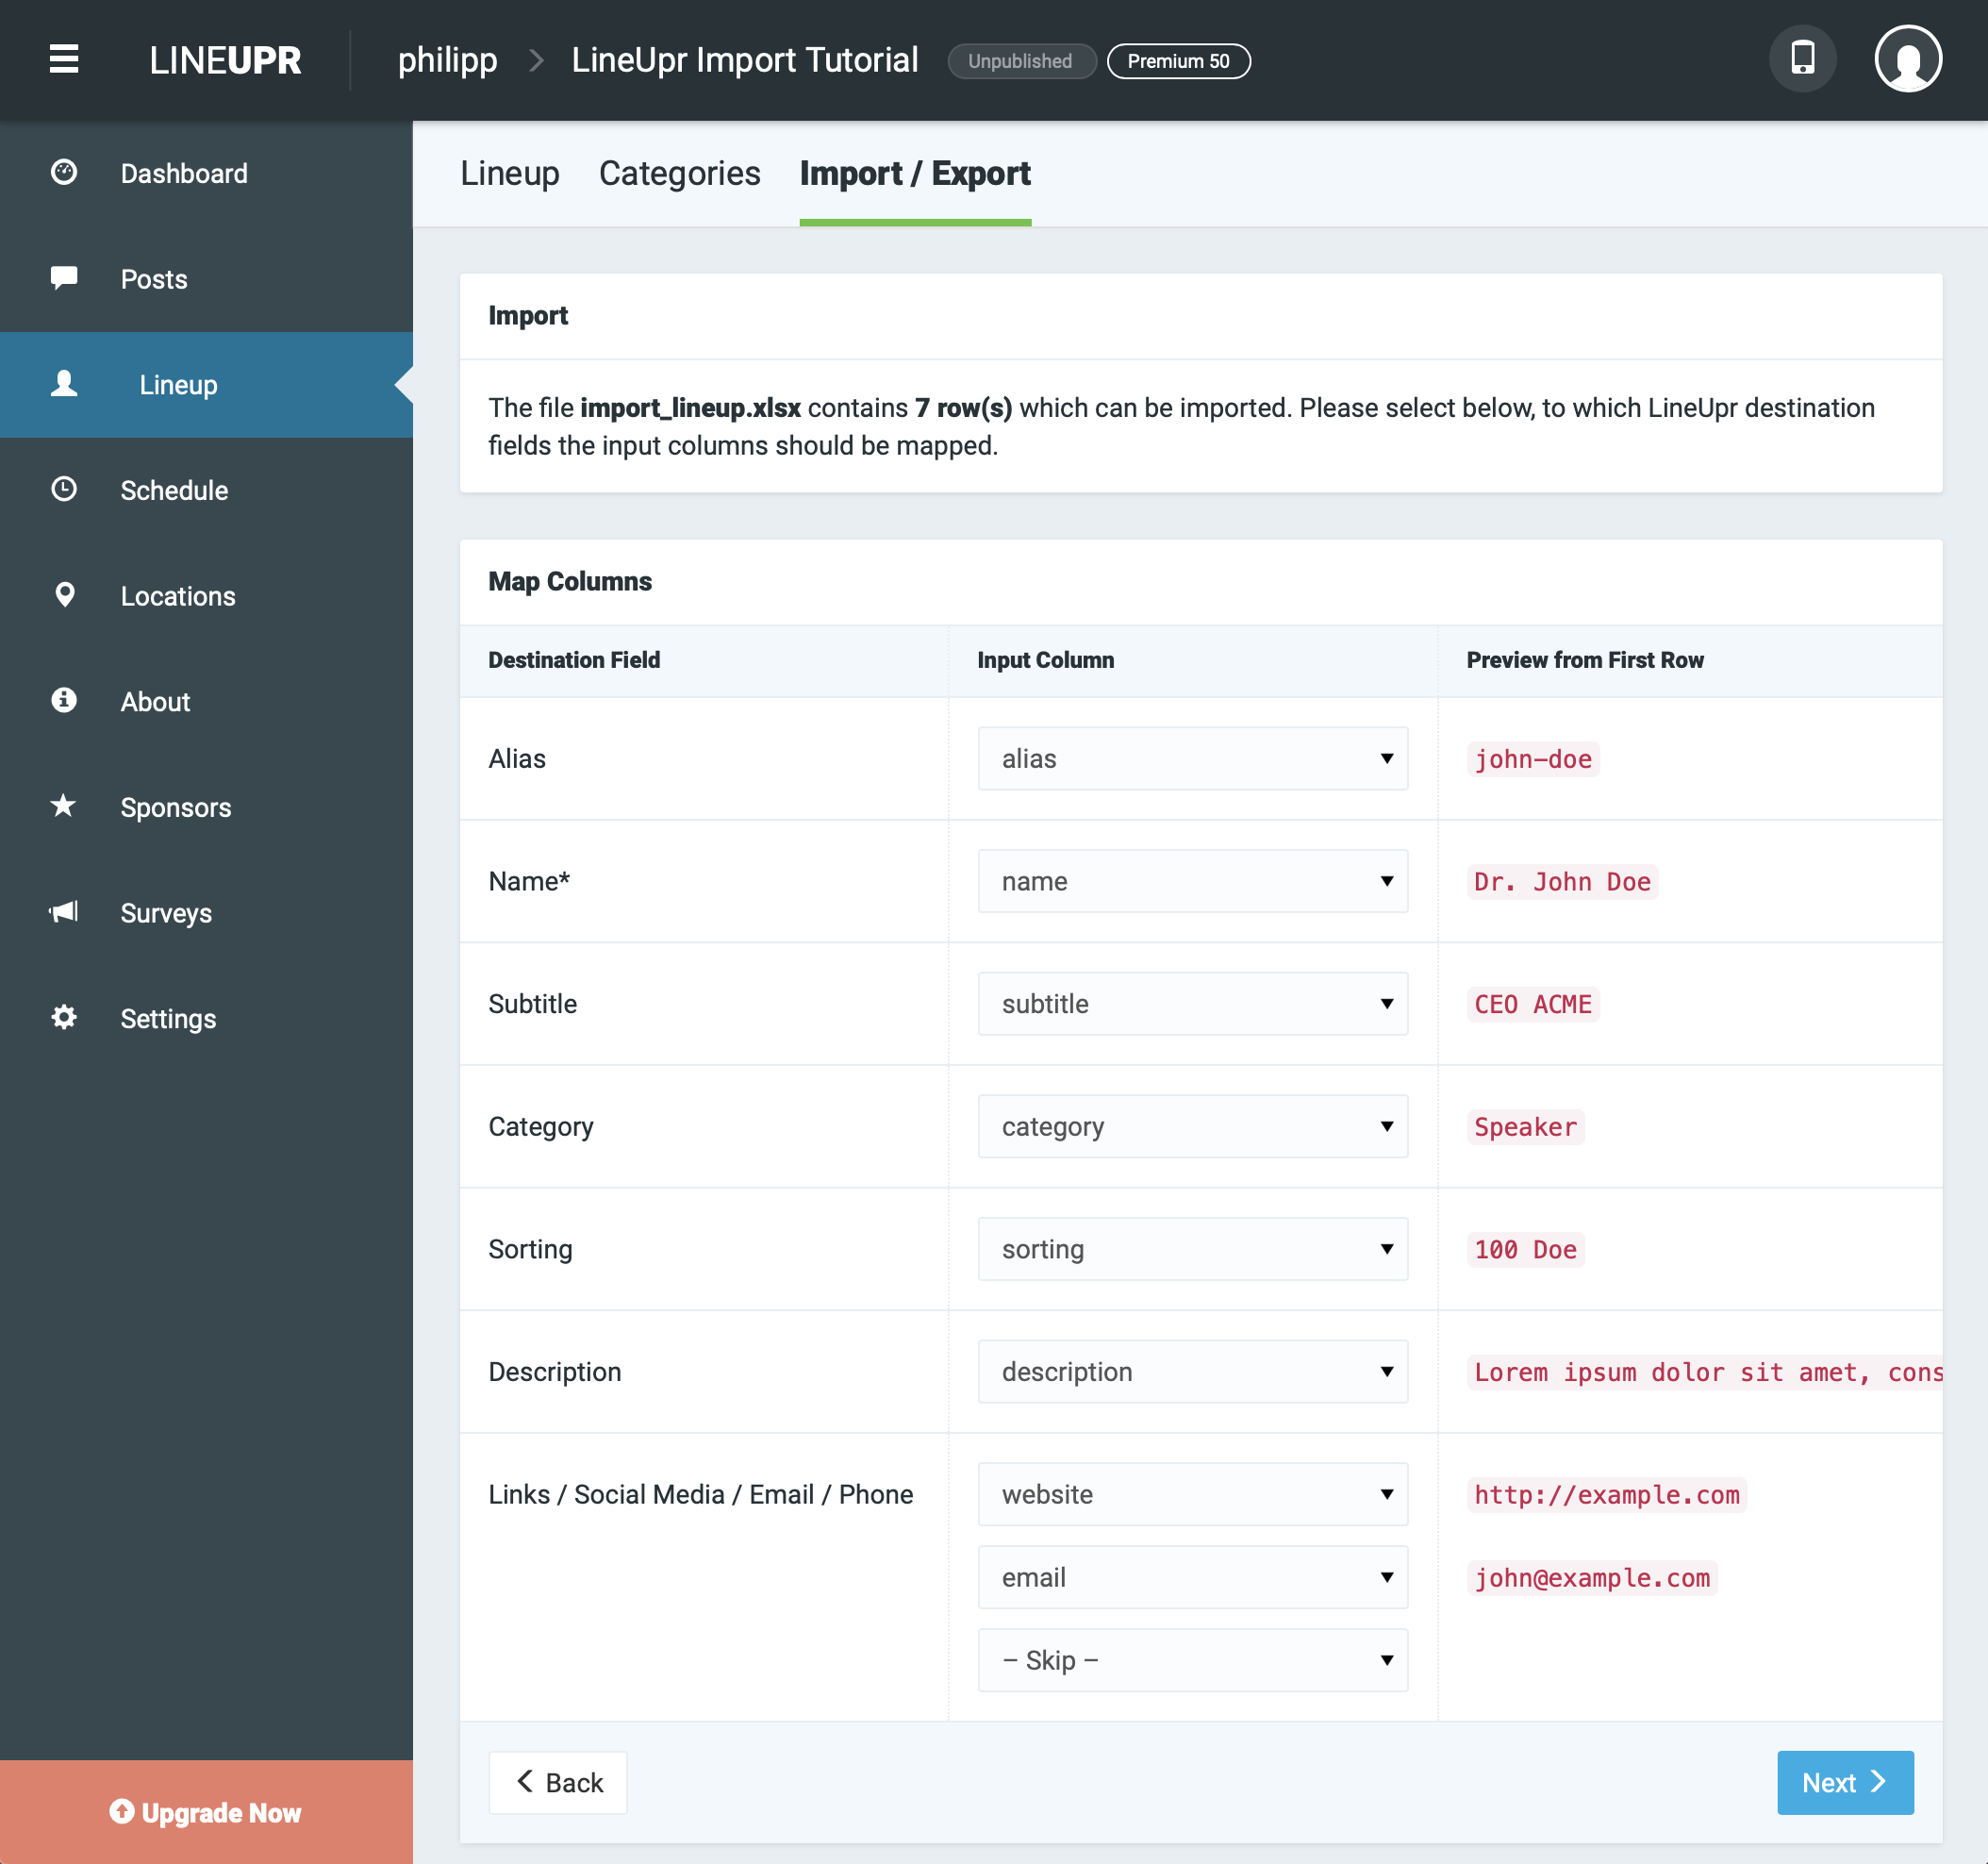
Click on Select Excel or CSV File to start importing and then select the file which is to be imported from your computer. As the next step, you can change the mapping of the individual columns in your file to the corresponding fields of LineUpr in case the automatic mapping failed. To do this, select the appropriate source column from the file to be imported for the individual target fields from the drop-down menus. Those fields marked with an * (such as “Name”) are mandatory. You can leave all other fields empty by selecting Skip in the menu.

The field “Slug” plays a special role, which serves as a unique identifier for your content within the respective areas and is also used as part of the respective URLs. If an entry with the same slug already exists in the system, it will be updated on import. If there is no entry with a corresponding slug, it will be created. In addition, slugs are automatically generated based on the title if you set the field to Skip. For example, from the name “Dr. John Doe”, the slug “dr-john-doe” is automatically generated.
If existing entries are updated during import and fields are set to “Skip”, the existing values are retained.
When you have all the columns assigned, click the Next button. You will then see a summary that shows you how many entries are added or changed by the import. If the summary matches your expectation, you can start the import by clicking on Start Import.
Please note that the import function does not delete any entries — that means that existing content is retained, even if they do not appear in the file to be imported. If you want to delete unnecessary entries before importing them, we recommend that you use the list editing function, which you can use to delete all entries at once. Go to the corresponding list, for example the “Lineup”, click on the button with the gear wheel, select “Delete” in the menu, check individual or all entries and then delete them with one click.
Below is an exact specification of the fields for each area.
Fields for “Lineup”
- Visibility: Determines whether the entry is visible (
TRUE) or invisible (FALSE). - Slug: Unique identifier for the entry. A connected string which may consist exclusively of the following characters is allowed:
a…z,0…9and-. Spaces, umlauts or other special characters are not allowed. - Name: Name of the person
- Subtitle: Subheading for the person (e.g. company name, position, …)
- Image: Filename of the image to be assigned. The image needs to be previously added to this event, e.g. by assigning it to an existing entry or by just dropping it into the image picker window. The filename of an existing image can be copied to the clipboard in the image picker window by clicking on Options and then Copy Image Name.
- Categories: Names of the categories to be assigned in exact spelling. To assign multiple categories, separate them with commas, for example
Category Alpha, Category Beta. Categories which do not already exist will be created automatically. - Sorting: Here you can determine how to sort the entries in lists; you can either enter numbers to prioritize your entries (lower numbers come first) or use, for example, the last names of the respective persons and sort according to this (or even combine both).
- Description: Description text of the entry. For structuring and formatting you can use the following HTML tags:
p,h1…h6,img,ul,ol,li,a,strong,em,b,i,br. Other HTML tags are automatically removed during import. - Attachments: Any number of attachments like URLs, email addresses, phone numbers or app-internal links to whole sections, individual entries or pdf files. The respective type is automatically assigned based on the content.
- URLs must be listed including protocol (i.e. “http://” or “https://”). The respective column heading is used as the description.
- Telephone numbers may only consist of the characters
0…9,+,-,/,.,(,)and spaces. The respective column heading is used as the description. - App-internal links are defined using the JSON format — this is a feature for advanced users. More information.
Fields for “Locations”
- Visibility: see above
- Type: Denotes the type of the location. Allowed are either
physicalorvirtual. As default, the typephysicalis assumed. - Slug: see above
- Name: Name of the location
- Image: see above
- Categories: see above
- Sorting: see above
- Street, House Number, City, Zip Code, State / Province / Region, and Country: Address of the location
- Latitude and Longitude (required for locations of type
physical): Coordinates of the location; Latitude and longitude must be specified as separate fields in WGS-84 format in decimal notation with periods and without°, for example49.1021and9.2117. - URL (for locations of type
virtual): Optional URL, which is shown in an iframe within the virtual location. - Description: see above
- Rooms: List with names of the rooms at the location; the individual entries in the string must be separated by commas, for example
Space Alpha, Space Beta, Space Gamma. - Attachments: see above
Fields for “Schedule”
- Visibility: see above
- Slug: see above
- Title: Title of the schedule item
- Location: Location at which the schedule item takes place. Here you must refer to the slug of an existing location. You can either take the slug out of your location import data or open the corresponding location in the browser and then copy the part after the last
/in the URL. - Room: Room within the location in which the schedule item takes place. Here you must refer to an existing room name in the corresponding location.
- Image: see above
- Categories: see above
- Sorting: see above
- Start Time und End Time: Date and time with start and (optional) end of schedule item in format
YYYY-MM-DD hh:mm, for example2018-07-06 12:45. - Lineup: Lineup entries associated with the schedule item. You have to refer to slugs of already existing entries in the area Lineup. You can either use the slugs from your lineup import data or open the contributors in the browser and then copy the part behind the last
/in the URL. If the schedule item has multiple contributors, separate their slugs with commas, for exampledr-john-doe, prof-alice-smith. - Description: see above
- Attachments: see above
Fields for “Sponsors”
See Lineup.
Fields for “Attendees”
- Email Address: A valid attendee email address. It must be unique, i.e. it may occur exactly once within the event. It is used by attendees in combination with a password of their choice to log in to the app.
- First Name: Attendee’s first name
- Last Name: Attendee’s last name
- Subtitle: see above
- Description: see above
- If your event uses the add-on Custom Attendee Fields, then you can import and export these as well.
- Each field which can contain exactly one value (Short Text, Long Text, URL, and Single Choice) is mapped to one single column.
- Fields which can contain multiple values (Multiple Choice) are mapped to multiple columns, from which each can contain one of the possible multiple choice answers (or stay empty).
JSON-Specification for App-internal Links
If you want to define app-internal links for importing or want to understand the exported JSON structure, you’re in the right place. This section is for advanced LineUpr users.
There are basically three types of internal links: those that point to entire sections, such as the “lineup” or “program” lists, those that link directly to an individual entry, such as a schedule item and those that link to a single pdf file.
General Information
Please note, that app-internal links can only point to categories, entries or PDF files that already exist in the current event. Therefore, avoid “cyclic” links where you have links between two entries.
Sections
For example, the JSON format for links to lists looks like this (here with line breaks for better clarity):
{
  "type": "list",
  "entityType": "contributor",
  "category": "Category Alpha"
}
The type must have the value list. entityType refers to the area you want to link to. Possible are the types contributor, sponsor, venue, item, announcement, page, survey, and attendee. Optionally, you can use category to specify the name of an existing category in order to display only the entries of that category.
Entries
To link to individual entries, set the value of type to entity. entityType refers to the area you want to link to (see above). entity is the slug of the entry you want to link to.
{
  "type": "entity",
  "entityType": "contributor",
  "entity": "john-doe"
}
PDF Files
To link to individual pdf files, set the value of type to file. name is the displayed name of the link. hash is the SHA-256 checksum of the file to identify it in the system.
To upload PDF files you have to add a “PDF File” attachment to an entry. And if you then open the file overview of all the files of the current event you can upload other PDF files.
{
  "type": "file",
  "name": "PDF File",
  "hash": "fa172579aea01cc10addde95aae6a67606d333b829a4e3db947"
}
JSON Data in CSV Files
When importing CSV files, please make sure that the JSON content is surrounded by quotation marks — as the contents themselves contain quotes, this must be “worked around” by adding one more quotation mark before each “internal” quotation mark in the JSON:
"{""type"":""list"",""entityType"":""contributor""}"